Bonbon – Encore un snood
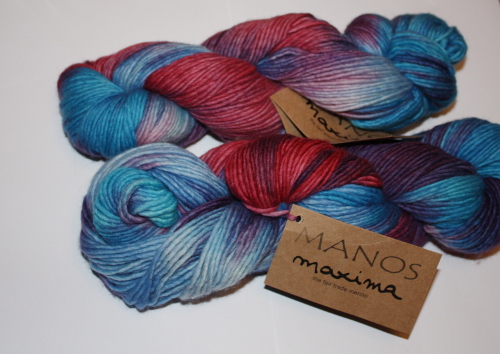
J’ai ramené 2 écheveaux de mérinos du magasin Loop & Leaf qui se trouve à Santa Barbara. C’est Maxima de Manos del Uruguay, teinté de façon artisanale. J’ai été séduite par le mélange de couleur entre bleu et rouge. Que puis-je faire avec 200 grammes de mérinos ? Encore un snood ? Pourquoi ? Car mon snood Highland est déjà sur le cou de mon chéri !
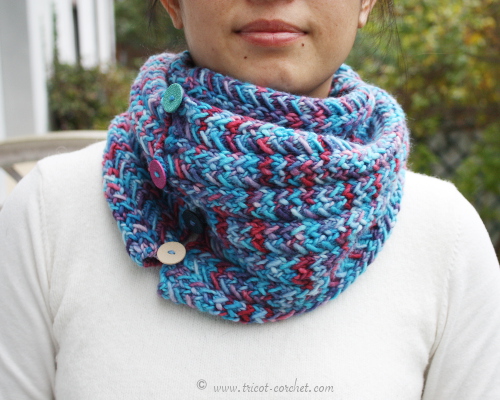
Ce n’eshttps://www.xiaowei-design.com/blog/highland-tuto-snood-tricote-avec-le-gros-point-de-vannerie/t pas toujours facile de trouver un point pour ce genre de fil varié. Il faut penser à mettre sa magnifique couleur en valeur et surtout à ressortir le point utilisé. Après beaucoup d’essais, j’ai enfin trouvé le point qui me plaisait. La couleur variée s’accroche bien à ce point. Voila, mon deuxième snood de cette année, Bonbon.


Tutoriel – Snood Bonbon
Type de laine : Worsted
Aiguille : 5mm
Métrage : 400m / 438 yds
Échantillon: 18 mailles=10cm en jersey
Astuces de taille : Pour avoir une largeur plus petite ou plus grande, il suffit de diminuer ou d’augmenter les mailles par 6.
Taille final du snood : 120 cm x 22 cm
Autres matériels : 1 crochet et 5 boutons
Abréviation : m=maille(s)
Instructions :
- Monter 50m (6×8+2). Il faut un nombre de m multiplié par 6, puis ajouter 2. 6m pour 1 motif, 2m pour les 2 bordures. Glisser la 1ère m de tous les rangs pour avoir de jolies bordures.
- Rang 1 (endroit) : glisser la 1ère m, *2m endroit, 2m endroit en enroulant le fil 2 fois autour de l’aiguille au lieu de 1 fois pour chaque m, 2m endroit*, répéter de * à * jusqu’à ce qu’il reste 1m, 1m endroit et tourner.
- Rang 2 (envers) : glisser la 1ère m, *Passer la 2e et 3e m à l’aiguille droite, dérouler la 4e m en 1 boucle, repasser la 2e et 3e m à l’aiguille gauche. Maintenant, à l’aide de l’aiguille droite, placer la 4e m devant la 2e m en la passant par dessus les 2e et 3e m, tricoter la à l’envers et puis m envers pour 2e et 3e m. Dérouler la 5e m en 1 boucle à l’aide de l’aiguille droite, puis la mettre derrière 7e m en les passant par dessus 6e et 7e m, m envers pour 6e et 7e m, 1m envers pour la 5e m*, répéter de * à * jusqu’à ce qu’il reste 1m, 1m endroit et tourner.

- Répéter les rangs 1 et 2 jusqu’à la longueur souhaitée et rabattre sur le côté endroit.
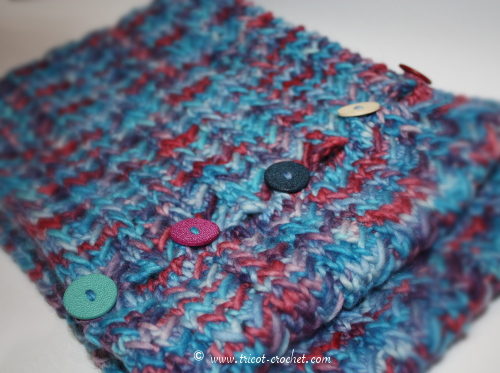
Pour les boutonnières, j’ai crocheté un rang en maille serrée avec 5 boucles en mailles en l’air. Vous pouvez faire à votre manière.
Maintenant, à vous de jouer !

![]()
I brought two skeins of merino of the store Loop & Leaf which is located in Santa Barbara. This yarn is Maxima by Manos del Uruguay, hand dyed. I was seduced by the mixture of color between blue and red. What can I do with 200 grams of merino? Another crowl ? Why ? Because my cowl Highland is already on the neck of my honey !
It is not always easy to find a stitch for this kind of varied yarn. You have to think of emphasizing its magnificent color and especially of taking out again the used point. After many tries, I finally found the stitch which pleased me. The varied color clings perfectly to this stitch. Well, my second cowl of this year, Bonbon.
Yarn type : Worsted
Needle : 5mm
Métrage : 400m / 438 yds
Gauge : 18 stitchs=10 cm / 4’’ in stockinette stitch
Sizing tips : To have a smaller or bigger width, it is enough to decrease or to increase stitches per 6.
Final size of this cowl : 120 cm x 22 cm
Autres matériels : 1 hook and 5 buttons
Abbreviation : st(s)=stitch(s), RS=Right side, WS=Wrong side, K=knit, P=purl
Instructions :
-
- Cast on 50 (6×8+2). You need a number of st multiplied per 6, and then added 2. 6 sts for 1 stitch pattern, 2 sts for two edges. Slip the 1st st of all the rows to have the pretty edges.
- Row 1 (RS) : slip 1, *K2, K2 and wind the thread twice around the needle instead of once for each st, K2; repeat from * to the last st, K1 and turn.
- Row 2 (WS) : slip 1, *Place the 2nd and 3rd sts to the right needle, unwind the 4th st in 1 loop, return the 2nd st and 3rd st to the left needle. Now, by means of the right needle, place the 4th st in front of 2nd st by passsing over the 2nd and 3rd sts, P this st and P the 2nd st and 3rd st. Unwind the 5th st in 1 loop by means of the right needle, then put it behind 7th st by passing over the 6th and 7th sts, P 6th st and 7th st, P 5th st; repeat from * to the last st, P1 and turn.

- Repeat the rows 1 and 2 util you have reached your desired length and bind off on the RS.
For buttonholes, I crocheted a row with single crochet sts and 5 loops with chain sts. You can make in your own way.
Now, it’s your turn !


Super modèle, merci pour le tuto! Et j’adore cette laine!!!
Oulala super trop joli ce snood !! En effet tu as trouvé un point qui va parfaitement à cette laine aux coloris mélangés. J’ai bien envie d’utiliser ton tuto pour m’en faire un !!
D’ailleurs, où as-tu trouvé tes écheveaux ? Car j’avais tricoté il y a deux ans un châle avec ce fil (et je le porte tout le temps), mais depuis le site sur lequel j’avais acheté ces écheveaux a arrêté la marque …
Bonne journée !!
C’est une laine que j’ai ramené des USA. Tu pourras peut être trouver sur net ? J’ai vu qu’il y en a sur Ebay. Bonne journée à toi aussi !
Ils en vendent sur Nature’s Luxury.
Complétement d’accord avec toi les motifs du point ressortent parfaitement bien et les couleurs sont mises en avant! ( Il a un petit nom ce joli point?). Ce snood porte très bien son nom, le rendu est so candy! ^^
Je connais ce point depuis longtemps. j’ai fait une petite recherche sur net mais rien trouvé.
Trop chouette ! Un vrai coup de <3 pour ton snood ! Je m'y attelle dès que ma commande arrive 😉 Merci pour le tuto
Pingback: Cols, tours de cou, snoods 2 | Pearltrees
Pingback: Tricot - lysbland | Pearltrees
Pingback: Chaussons, pantoufles | Pearltrees